Pardot Prospect Mailability Upgrade Checklist
Pardot prospect mailability insights is now generally available with the Winter ‘22 release.
This means that you will no longer be requested to upgrade your Pardot to access the Pardot Prospect Mailability feature.
One the key aims of the prospect mailability upgrade is to unlink the Opted Out and Do Not Email fields. See Destined’s blog: Managing Mailable Prospects in Pardot
While this will create additional autonomy and control for marketing users some anomalies have been found where unlinking the fields has not been fully executed with the upgrade.
If you are reading this blog in September / October 2021 prior to the automatic upgrade, we suggest you undertake the following in your Pardot.
1. Create 3 backup lists to record prospects original mailability status prior to the upgrade
To create the lists go to Prospects > Segmentation Lists and use filters to find all “unsubscribed, unmailable and mailable” prospects. Select all prospects and add to the respective lists you have created.
- All Unsubscribed Prospects prior upgrade (date of the upgrade)
- All Unmailable Prospects prior upgrade (date of the upgrade)
- All Mailable Prospects prior upgrade (date of the upgrade)
Note, selecting all prospects and adding them to a list can be easily accomplished using Table Actions.
2. Create 2 backup Salesforce reports to record Lead and Contact hard bounce status prior to the upgrade
Generate a Lead report and Contact report in Salesforce which includes the Pardot Hard Bounce field as a filter. Reports can be named:
- All Leads with Hard Bounce prior upgrade
- All Contacts with Hard Bounce prior upgrade
Note, there might be a difference in the actual numbers if you have Prospects in your database that are not assigned and never end up in Salesforce as Leads and contacts.
3. Check and record the number of mailable prospects shown in your Usage and Limits settings
To find Usage and Limits go to Pardot Settings > Usage and Limits
Taking a screenshot of the Account Usage tab is a good way to check how Pardot would be recording all mailable Prospects after the upgrade. The aim is to have the same number of mailable Prospects after the upgrade.

4. Check if the “Do Not Email” and “Opted Out” fields are used in any of your automations (automation rules and completion actions)
Go to Pardot Settings > Object and Field Configuration > Prospect Fields
Click on the respective field and view the field usage tab.
If the Opted Out or Do Not Emails fields are used in any automations, create a backup list for each automation. Do this by selecting all Prospects who have matched the automation and add them to the respective lists.
- Opted Out - automation lists prior upgrade
- Do not Email - automation lists prior upgrade
Note, selecting all prospects and adding them to a list can be easily accomplished using Table Actions.
5. You are ready to upgrade to the new mailability feature!

Once you’ve upgraded, it's time to check the Prospects numbers after the upgrade. As in step 1, created all the lists again and add prospects using Table Actions based on the filters unsubscribed, unmailable and mailable.
- All Unsubscribed Prospects after upgrade (date of the upgrade)
- All Unmailable Prospects after upgrade (date of the upgrade)
- All Mailable Prospects after upgrade (date of the upgrade)
If all the numbers in the lists match and the mailable Prospects, check mailable prospects for step 3. If this is the same prior to the upgrade then the process was successful! To understand more about the feature view our blog here before jumping to step 7.
6. What happens if my prospect numbers don’t add up after the upgrade?
In this case, start investigating where the problems might occur. The easiest way to do so would be to create dynamic lists to check if any prospect are on the “after upgrade” lists but and not on the “prior upgrade” lists (and vice versa).
You now can also create lists for Hard and Soft bounces to be able to check against the two Salesforce reports (Step 2).
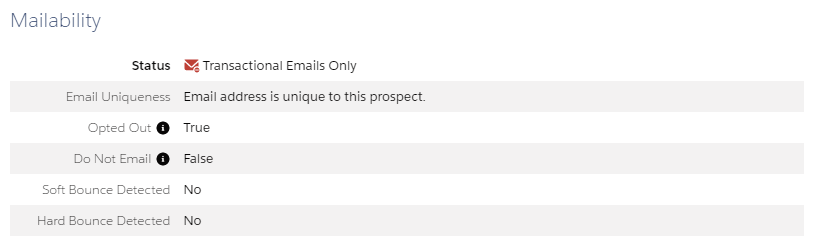
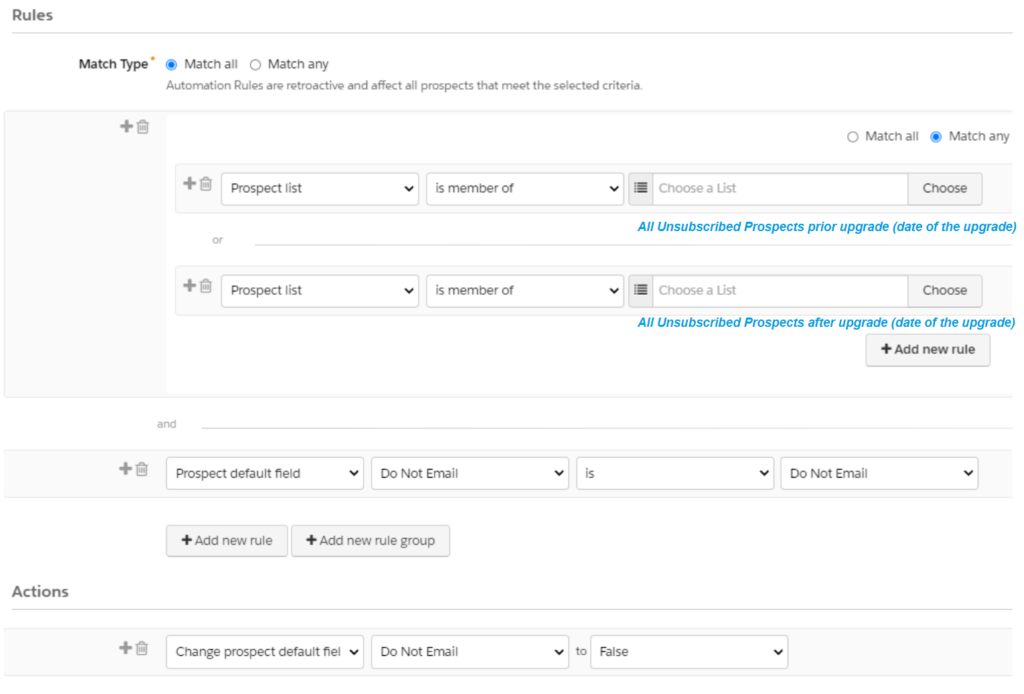
7. Update the "Do Not Email" field to leverage the Resubscribe feature
Now that the Opted Out and Do Not Email fields are no longer linked. You need to ensure all unsubscribed prospects (those who have opted out from receiving marketing communication) are flagged in Pardot with:
- Opted Out = True
- Do Not Email = False
There are a few ways you can handle this process. One option is to create an automation rule which includes:
To find out more about the prospect mailability feature view our blog here.
Recent Posts

International Women’s Day
International Women’s Day International Women’s Day is an opportunity to celebrate successes women are achieving in the workplace. To mark International Women’s Day 2022, we asked our women in tech what they most [...]